
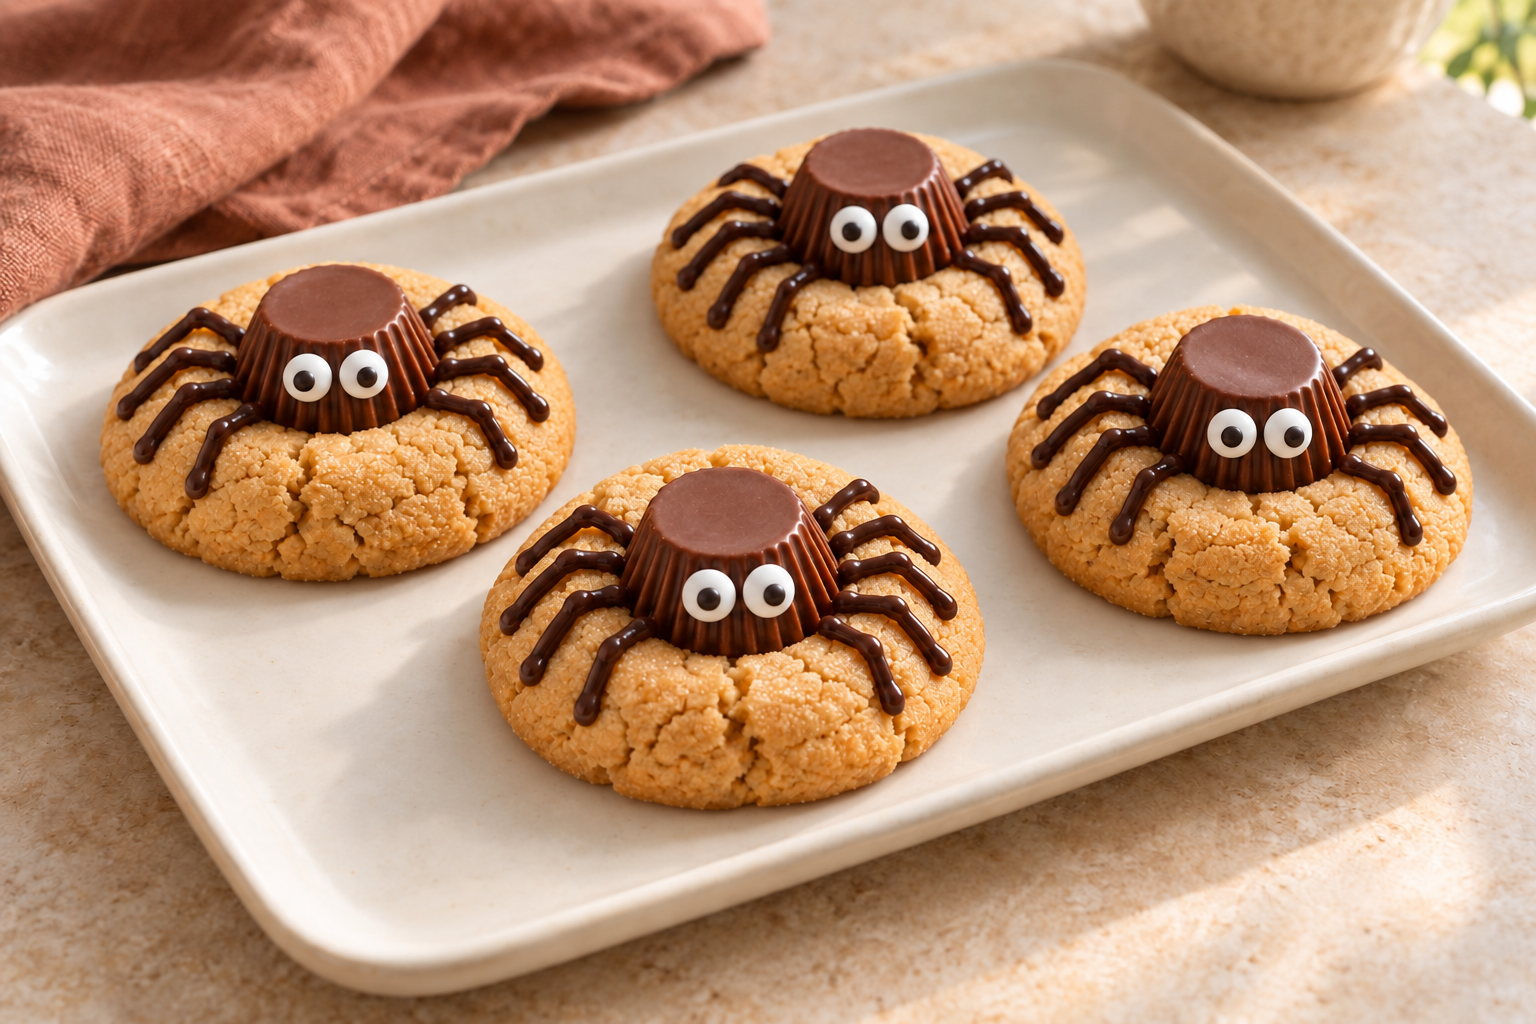
Give your Halloween cookie tray a few extra eyes. These peanut butter cookies turn into little spiders with a chocolate peanut butter cup in the center, eight piped chocolate legs, and a pair of candy eyes. The decorations are simple enough to give every spider a slightly different expression.
The dough goes straight from the mixing bowl to shaping and baking. While the cookies bake, the unwrapped peanut butter cups wait in the freezer, ready to press into the warm centers. After cooling, a little melted chocolate brings the spiders to life.

Before you start
Yield: approximately 24 cookies
Prep: about 15 minutes
Bake: 8–11 minutes per batch
Oven: 350°F (177°C)
Cooling: 15–20 minutes on the baking sheet, then finish cooling on a rack
Allow extra time: for decorating and for the chocolate to set
Use regular creamy peanut butter for this dough; natural peanut butter is not the intended ingredient. Have the peanut butter cups unwrapped before you mix, and keep the baking sheet available after baking. The cookies need to rest on it before they are firm enough to move.
For equipment, gather an electric mixer, a mixing bowl, a spatula, a tablespoon or small cookie scoop, a shallow dish for sugar, a baking sheet with a silicone baking mat, a cooling rack, and a microwave-safe bowl. A squeeze bottle or a sandwich bag with one corner snipped off will work for the chocolate legs.
Ingredients
For the peanut butter cookies
- ½ cup (113g) unsalted butter, at room temperature
- ½ cup (107g) brown sugar
- ⅓ cup (66g) granulated sugar
- ¾ cup (201g) creamy peanut butter, not natural peanut butter
- 1 large egg
- 1 teaspoon vanilla extract
- 1½ cups (180g) all-purpose flour
- 1 teaspoon baking soda
- ½ teaspoon baking powder
- ½ teaspoon salt
For rolling and decorating
- Additional granulated sugar, for rolling the dough balls
- About 24 mini Reese’s peanut butter cups, unwrapped
- ½ cup (85g) semi-sweet chocolate chips
- ½ teaspoon neutral oil, if needed when melting the chocolate
- Candy eyeballs, two per cookie—about 48 for a batch of 24
The extra sugar is separate from the ⅓ cup mixed into the dough. Use the small individually wrapped peanut butter cups for the centers.
How to make peanut butter spider cookies
1. Chill the candy and heat the oven
Unwrap about 24 mini peanut butter cups, put them in a bowl, and place the bowl in the freezer. Chilling helps the chocolate cups keep their shape when they meet the hot cookies. Preheat the oven to 350°F (177°C).
2. Mix the cookie dough
Beat the butter, brown sugar, and ⅓ cup granulated sugar with an electric mixer for 1 minute, until the mixture is smooth and fluffy. Add the peanut butter, egg, and vanilla. Beat again for less than 1 minute, until incorporated.
Add the flour, baking soda, baking powder, and salt. Mix on low speed or fold with a spatula, stopping as soon as the dough comes together. Avoid continuing to mix after the dry ingredients are incorporated.

3. Shape and coat in sugar
Use a small cookie scoop or tablespoon to portion the dough into tablespoon-sized balls. Roll each portion between your palms to make it evenly round, then roll it in the additional granulated sugar.
Arrange the balls 2–3 inches apart on a baking sheet lined with a silicone baking mat.

4. Bake until the edges are ready
Bake for 8–11 minutes. Look for edges that are beginning to crack and turn golden, with the cookies looking set. Check within that time range rather than waiting for the whole cookie to become deeply browned.
5. Add the peanut butter cups immediately
Take the cookies out of the oven and press one chilled mini peanut butter cup into the center of each cookie while it is hot.
Leave the cookies on the baking sheet for 15–20 minutes before transferring them to a cooling rack. Moving them too early can make the peanut butter cups sink and the cookies lose their shape. Let them finish cooling completely on the rack before decorating.

6. Melt the chocolate
Put the ½ cup (85g) semi-sweet chocolate chips in a microwave-safe bowl. Add the ½ teaspoon neutral oil if needed to help the chocolate flow for decorating.
Microwave for 3 minutes at 50% power, pausing after each minute to stir. Continue microwaving as needed until the chocolate is fully melted. Transfer it to a squeeze bottle or a sandwich bag with a small corner cut off.
7. Pipe eight legs
Draw four chocolate legs on each side of the peanut butter cup, extending them across the cookie surface. Small bends in the lines help make the spider shape clear.

8. Attach the eyes and let the chocolate set
Dab a small amount of melted chocolate onto the back of each candy eye and attach two eyes to each peanut butter cup. Do this while the chocolate is still melted so it can hold the eyes in place.
Leave the cookies undisturbed until the chocolate has set, then move them to a serving platter.

Details that help the cookies hold their shape
Keep the butter at room temperature, without letting it become overly soft. It should be ready to beat with the sugars, rather than melted.
Use the freezer for the peanut butter cups. The dough itself does not need chilling. Keeping these two steps separate makes the process easier to follow.
Make the dough balls the same size. Consistent portions help the batch bake evenly. Use the tablespoon or scoop throughout the batch instead of changing the amount from cookie to cookie.
Give the baked cookies their full rest. The 15–20 minutes on the sheet is part of the method. Set the cooling rack nearby, but wait before transferring the cookies.
Wait for the decorations to set before arranging the platter. Finish attaching the eyes while the chocolate is workable, then leave the cookies in place so the legs and eyes can firm up.
Storage and making ahead
At room temperature
Keep the cookies in an airtight container for up to 3 days. If you stack them, put parchment between the layers to help protect the chocolate decorations.
Freezing baked cookies
Let the cookies cool completely and the chocolate decorations set. Pack them in an airtight freezer-safe container and freeze for up to 3 months.
Freezing the dough
Shape the dough into balls, but leave off the sugar coating before freezing. Freeze the balls on a baking sheet until firm, then transfer them to a freezer bag or container.
Quick questions
Can I use natural peanut butter?
Use regular creamy peanut butter to follow this recipe as written. Keep the listed amount of ¾ cup (201g).
Do I need to chill the cookie dough?
No. Mix, portion, roll in sugar, and bake. The peanut butter cups are the part that goes into the freezer before use.
When should I add the peanut butter cups?
Press them in as soon as the cookies come out of the oven. Add the chocolate legs and candy eyes later, after the cookies have cooled.
Are the cookies ready to serve as soon as they are decorated?
Let the melted chocolate set before moving the cookies to a platter. Baking takes 8–11 minutes per batch, but the sheet-cooling time, final cooling, decorating, and setting time also need a place in your schedule.
Serve the spiders together on a simple platter so their little faces stand out. The same cookie and chocolate combination works whether your spiders look perfectly tidy or a little mischievous.


Leave a Reply